

Images are important for both businesses and personal branding in today’s world. However, sometimes images may not be perfect and require editing before use.
This blog post will explain the benefits of using an image masking service and the different types available. This will help you choose the right masking service for your needs. So, let’s begin!
What is Image Masking?
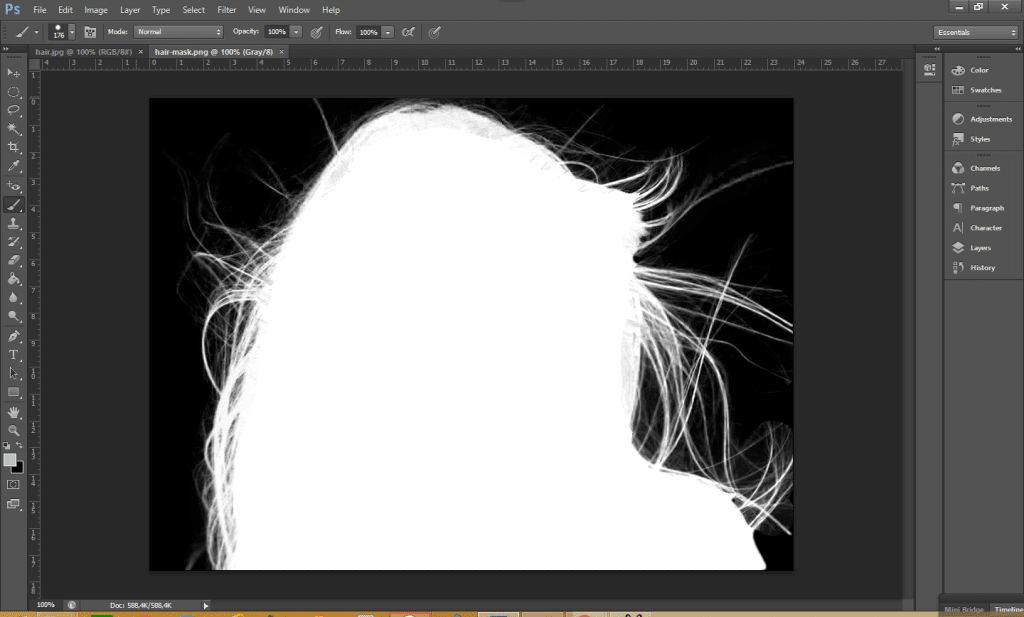
Image masking, also known as layer masking, is a technique used to isolate a specific area of an image, such as the background or an object, to make it transparent or semi-transparent. This technique is commonly used in product photography, e-commerce, and graphic design. Additionally, this photo editing service can separate the foreground and background of a photo, making it easier to edit or manipulate the desired part of the photo.
Benefits of Image Masking
Image masking offers several advantages that enhance precision, flexibility, and visual appeal, making it a valuable technique in the field of photo editing. Some of the key benefits of image masking include:
Precision
Image masking enables precise selections, even around intricate shapes, curves, and fine details. This level of precision allows you to have complete control over the editing process, ensuring accurate and seamless results.
Layers Editing
With image masking, you can edit multiple layers of an image independently without affecting other elements. This layer masking application provides a convenient way to work with complex compositions, allowing you to adjust, modify, or add new elements while maintaining the integrity of the original image.
Flexibility
Image masking offers great flexibility in editing. It allows you to make adjustments or try different edits without starting the editing process from scratch. By using masking techniques, you can refine or alter specific areas of an image while keeping the rest of the composition intact.
Non-destructive Editing
One of the significant advantages of image masking is its non-destructive nature. Rather than modifying the original image directly, you can create a separate layer for the modifications. This approach preserves the original image and ensures that any editing changes can be easily undone or modified at any point in the future.
Improved SEO
Image masking can contribute to enhancing the search engine optimization (SEO) of a website. By utilizing this photo editing service, you can make your photos more visually appealing and engaging. This visual enhancement allows you to provide better descriptions and tags for the images, which can ultimately lead to increased visibility and higher rankings in search engine results pages. Overall, image masking is a powerful technique that offers precision, layer control, flexibility, non-destructive editing, and SEO benefits. It is widely used in various industries such as graphic design, e-commerce, advertising, and photography, allowing professionals to achieve stunning and visually captivating results in their image editing endeavors.
Improve Your Online Business
To attract potential customers and convert them into buyers, visually appealing product images are crucial for online businesses. Image masking is a necessary technique for any virtual business because it offers many benefits, such as:
- Allowing for background removal and manipulation without affecting the subject
- Enabling accurate selection and isolation of specific elements for further editing
- Creating photo-realistic composites by merging images seamlessly
- Improving the visual appeal of product images for e-commerce
- Creating transparent PNG images for use in graphic design and web development.
Types of Image Masking
While masking is often used for images with complex details or irregular shapes, there are different types of image masking available, each with its own unique applications and benefits:
Layer Masking
Layer masking is a technique used in image editing software, such as Adobe Photoshop, to selectively reveal or hide portions of a layer without permanently altering the original image. It involves creating a mask that acts as a stencil, determining which areas of the layer are visible or transparent.
Here’s how layer masking works and some of its benefits:
Creating a Layer Mask: To apply a layer mask, you start by adding it to a layer in your image editing software. The layer mask appears as a grayscale image thumbnail next to the layer thumbnail. White areas of the mask indicate fully visible portions of the layer, while black areas indicate fully transparent areas. Gray areas represent partially visible or semi-transparent regions.
Painting on the Mask: You can then use painting tools, such as brushes or gradient tools, to paint on the layer mask. Painting with white on the mask reveals the corresponding areas of the layer, while painting with black conceals those areas. Gray shades allow for partial transparency, enabling smooth transitions and blending.
Non-Destructive Editing: Layer masking is a non-destructive editing technique because it doesn’t permanently alter the underlying layer. If you make a mistake or want to modify the mask later, you can simply switch to the mask thumbnail and edit it accordingly. This flexibility allows for experimentation and easy adjustments without compromising the original image data.
Refining Edges: Layer masking is particularly useful for intricate selections and refining edges. It allows for precise control over which areas of a layer are visible or hidden, even around complex shapes, curves, or detailed elements. This makes it ideal for tasks such as isolating objects, removing backgrounds, or combining multiple images seamlessly.
Combining Layers: Layer masking enables you to combine multiple layers, each with its own mask, to create complex compositions. By selectively revealing or hiding portions of each layer, you can layer elements and create composite images with ease. This capability is crucial for tasks like photo manipulation, graphic design, and creating visual effects.
Layer Masking Applications
Layer masking finds extensive use in various creative fields. It is commonly employed in graphic design, digital art, photo retouching, and compositing. It allows artists and designers to work non-destructively, experiment with different layer combinations, and achieve precise control over their compositions.
Layer masking is a powerful tool that empowers creative professionals to manipulate images with precision, maintain flexibility in editing, and seamlessly combine different layers to produce visually stunning results. Its non-destructive nature and versatility make it a fundamental technique in the realm of digital image editing.
Channel Masking
Channel masking is a technique used in image editing to create a mask based on the information in a specific color channel of an image. Instead of using grayscale values like traditional layer masks, channel masks use the contrast and brightness information from individual color channels (such as red, green, or blue) to determine the visibility of pixels.
Here’s how channel masking works and some of its benefits:
Channel Selection: In image editing software like Adobe Photoshop, you can access the individual color channels of an image. These channels represent the amount of red, green, and blue light in each pixel. By selecting a specific channel, you isolate the grayscale representation of that color channel.
Contrast and Brightness: The contrast and brightness information within a specific color channel can be used to create a channel mask. Darker areas of the channel represent regions that will be masked or hidden, while lighter areas will be revealed.
Creating the Mask: To create a channel mask, you can copy the grayscale representation of the selected channel and paste it as a new layer or channel mask. This will create a mask based on the contrast and brightness values of the chosen channel. Darker areas in the channel will correspond to areas that are masked or hidden, while lighter areas will be visible.
Refining the Mask: Once the channel mask is created, you can further refine it by using editing tools like brushes or selection tools to adjust the areas of transparency or opacity. This allows for precise control over which areas of the image are revealed or concealed based on the channel’s contrast and brightness information.
Unique Masking Effects: Channel masking can produce unique effects and adjustments that are not easily achieved with traditional grayscale masks. Since each color channel contains different information, using channel masks can selectively target and manipulate specific color components of an image, resulting in creative and visually striking effects.
Professional Editing Applications: Channel masking is commonly used in professional image editing workflows, particularly in areas such as color correction, retouching, and complex image adjustments.
Channel masking offers a flexible and precise way to control the visibility of pixels based on the contrast and brightness information of individual color channels. It is a valuable technique in image editing, enabling creative professionals to achieve unique and targeted adjustments in color and tonal values for enhanced visual impact.
Clipping Path Masking
When it comes to masking with only a clipping path, the process involves using the clipping path as a mask to hide or reveal portions of an image based on the defined path. This technique is often referred to as “clipping path masking” or “path-based masking.” Here’s how it works:
Creating the Clipping Path: The first step is to create a precise clipping path around the object or subject you want to isolate. This can be done using software like Adobe Photoshop or Adobe Illustrator, using the Pen Tool or other selection tools to trace the edges of the object and create a closed path.
Converting the Clipping Path to a Mask: Once the clipping path is created, it can be converted into a mask. In Photoshop, you can do this by right-clicking on the path and selecting “Create Vector Mask.” This will convert the path into a mask, with the object appearing inside the mask and the background outside the mask.
Refining the Mask: After converting the clipping path to a mask, you can refine it further if needed. You can use editing tools like brushes or selection tools to manually adjust the mask edges, clean up any areas that need refinement, or make additional modifications to achieve a more precise masking result.
Applying the Clipping Path Mask: Once the mask is refined, you can apply it to achieve various effects.
Clipping path masking is commonly used in product photography, e-commerce, catalog design, and advertising, where it’s crucial to isolate objects from their backgrounds with precision.
It’s important to note that while clipping path masking can be effective for objects with well-defined edges, it may not be suitable for images with complex or intricate details. In such cases, additional masking techniques like layer masks or alpha channel masks may be required to achieve more accurate results.
Alpha Channel Masking
Alpha channel masking is a technique used in image editing to create masks based on the alpha channel of an image. The alpha channel represents the transparency or opacity information of each pixel in an image. By using the alpha channel as a mask, you can control the visibility of pixels, allowing you to isolate objects, create transparent areas, or apply selective adjustments.
Here’s how alpha channel masking works and its benefits:
Alpha Channel Extraction: The alpha channel is typically stored as a separate channel within an image file, alongside the red, green, and blue (RGB) channels. This channel contains grayscale values ranging from 0 (fully transparent) to 255 (fully opaque), representing the transparency levels of each pixel.
Creating the Mask: To create an alpha channel mask, you can extract the alpha channel from the image and use it as a mask. This can be achieved by duplicating the alpha channel or copying its contents to a new layer or mask.
Refining the Mask: Once the alpha channel mask is created, you can refine it using editing tools such as brushes, selection tools, or adjustment layers. By painting or modifying the grayscale values of the mask, you can control which areas of the image will be fully visible, partially visible, or transparent.
Masking Applications: Alpha channel masking offers a wide range of applications. It is commonly useful for tasks like object isolation, where you can remove the background by making the non-object areas transparent. It is also useful for creating transparent or semi-transparent areas within an image, such as for creating cutouts or complex composites.
Layer Compositing: Alpha channel masking allows for seamless layer compositing and blending. By combining images with different alpha channel masks, you can create smooth transitions and overlays between elements, achieving realistic and visually appealing results.
Non-Destructive Editing: Alpha channel masking, like other masking techniques, is non-destructive. It preserves the original image data and allows for easy modifications or reversals of the masking effects. You can edit the mask or make adjustments to the image without permanently altering the underlying pixels.
Alpha channel masking Applications
Alpha channel masking is widely used in graphic design, digital art, photography, and post-production workflows. It provides precise control over transparency, enabling the creation of complex compositions, selective adjustments, and seamless integration of elements. This technique empowers creative professionals to achieve visually stunning and professional results in their image editing endeavors.
Transparent Masking
Transparent masking is a technique used in image editing to create masks that define areas of transparency within an image. It involves selectively making certain portions of an image transparent, allowing the underlying layers or background to show through.
Here’s how transparent masking works and its applications:
Creating Transparency: To create transparency in an image, you can use various methods such as selection tools, brushes, or erasers to manually remove or erase portions of the image.
Refining the Transparency: After initial removal of areas, you can refine the transparency using tools like feathering or anti-aliasing to create smooth transitions between opaque and transparent regions. This helps blend the edges of the transparent areas more seamlessly with the rest of the image.
Applications of Transparent Masking
Transparent masking finds applications in a wide range of scenarios. Some common examples include:
Image Overlays: Transparent masking allows you to overlay images on top of each other while preserving transparency in certain areas. This is useful for creating collages, combining multiple elements, or applying special effects.
Product Photography: Transparent masking is often used in product photography to remove the background and make the product appear on a transparent or custom background. This is commonly seen in e-commerce websites where products are showcased without distracting backgrounds.
Logos and Watermarks: Transparent masking is essential when creating logos or watermarks that need to be placed on various backgrounds. By making the non-logo or non-watermark areas transparent, the graphic can be easily placed on different backgrounds without any visible boundaries.
Web Design: Transparent masking allows web designers to create visually appealing websites by integrating images with the underlying website elements. It enables seamless integration of images, graphics, or illustrations with the website layout.
Transparent masking is a powerful technique that provides flexibility in image editing and design. It allows you to create dynamic compositions, remove unwanted backgrounds, and integrate images smoothly into various contexts. By leveraging transparent masking, you can achieve visually appealing and professional results in your image editing and design projects.
Hair Masking
Hair masking is a specialized technique in image editing used to separate and extract the intricate details of hair from an image with complex backgrounds. The goal of hair masking is to maintain the natural appearance of hair while removing the background or applying adjustments.
Here’s how hair masking works and some considerations for achieving accurate results:
Selecting the Hair: Hair masking starts with making a rough selection of the hair using selection tools like the Quick Selection Tool, Magic Wand Tool, or Lasso Tool. This initial selection doesn’t need to be precise but should encompass the majority of the hair.
Refining the Hair Mask: After making the initial selection, the next step is to refine the hair mask to include fine details and ensure accurate separation from the background. This can be done using advanced selection techniques like refining edges, feathering, or utilizing the Select and Mask feature in software like Adobe Photoshop.
Fine-tuning with Brushes: Hair masking often requires manually painting in or erasing areas of the mask to capture stray hairs or intricate details that were not accurately selected.
Dealing with Difficult Areas: Hair masking can be challenging when dealing with complex or difficult areas such as flyaways, transparent or wispy hair strands, or hair against similar-toned backgrounds. In these cases, a combination of careful selection, refining edges, and using additional tools like the Pen Tool or advanced masking techniques may be necessary.
Hair Masking Applications
Hair masking is useful in various situations, including:
- Background Removal: Hair masking allows you to separate hair from the background and remove or replace the background while preserving the intricate details of the hair.
- Portrait Retouching: Hair masking is valuable in portrait retouching to enhance hair appearance, adjust hair color, or apply styling effects while maintaining a natural look.
- Composite Images: Hair masking enables you to combine multiple images or elements, seamlessly blending hair with new backgrounds or incorporating hair into different compositions.
Achieving accurate and realistic hair masking requires patience, attention to detail, and skill. It is important to consider factors such as lighting, hair texture, and the overall image quality to obtain a natural-looking result. With practice and experience, hair masking can be a valuable technique for achieving professional and visually appealing image editing outcomes.
Image masking is an essential technique that can help businesses achieve professional-looking images that stand out in their industry. Whether it’s removing a background, isolating a specific object, or creating a transparent image, using layer masking services can help achieve desired results. Reputed image editing service companies have image masking experts who can assist in making this process easier.